Technical Resources
Educational Resources
APM Integrated Experience
Connect with Us
Do you have tracking pixels on your webpages? Tracking pixels have many benefits, so if the answer is no, you might want to consider them. And if your answer is yes, are you collecting data with the tracking pixels? How do you log this data? Logs keep records of the data collected.
When set up properly, tracking pixels can be used to capture useful data for marketing, user experience (UX) improvement, and debugging. Some examples of such data include the following:
– A user’s browser/user agent
– The type of device used to access a webpage
– A user’s IP/location
– The date and time a user performs certain actions (like reading an email or opening a webpage)
There are many analytics tools available for setting up tracking pixels. The types of data you can collect depend on how you set up your tracking pixels. By building your own tracking pixel from the ground up, you can collect the most important data for your marketing efforts.
In this post, I’ll tell you everything you need to know to get started using tracking pixels. I’ll give you an overview of what a tracking pixel is, and for those who haven’t used tracking pixels before, I’ll also teach you how to set one up. Finally, I’ll show you how to troubleshoot your tracking pixel logs.
Tracking pixels are one-by-one-pixel transparent GIF images included in webpages and emails to track user activity or collect data. Using a tracking pixel, it’s possible to confirm when a recipient reads your email. Additionally, you can use a tracking pixel to collect and log data from users who visit your webpages.
Tracking pixel logs are records of activities and data from a tracking pixel. By default, most servers generate logs for every HTTP request. Since tracking pixels trigger HTTP requests, server logs may contain records of data from tracking pixels.
If you’re using an existing analytics tool, it’s likely the tool has a built-in feature for logging data. The tool may also let you configure what data to track from your users.
You can set up a simple tracking pixel by uploading a one-by-one-pixel transparent GIF to a file hosting service with a downloads (hits) counter. You can then include the GIF in your email or webpage. The hosting service will log a new hit anytime the tracking pixel is loaded in an email or webpage.
By building your own custom tool, you get a more flexible option for storing tracking pixel logs. The tool can dump the tracked data into a database or a text file.
What’s the downside of building your own tool? It requires coding skills or hiring a developer. You’ll need to set up a script using a programming language such as JavaScript and write some code on the back end to log the data collected into a database. But on the positive side, this option gives you full control over the data you wish to track and how it’s logged.
Let’s assume we have a tracking pixel hosted at the URL https://example.com/tp.gif. Somewhere on your webpage or email (usually on the footer, where there’s less visibility), add the tracking pixel using the following HTML code:
<img src="https://example.com/tp.gif">Your webpage will send an HTTP request to the tracking pixel. This will happen each time users load the page. Similarly, users reading an email containing the tracking pixel will trigger an HTTP request. Your server should be able to log data for every hit the tracking pixel image receives.
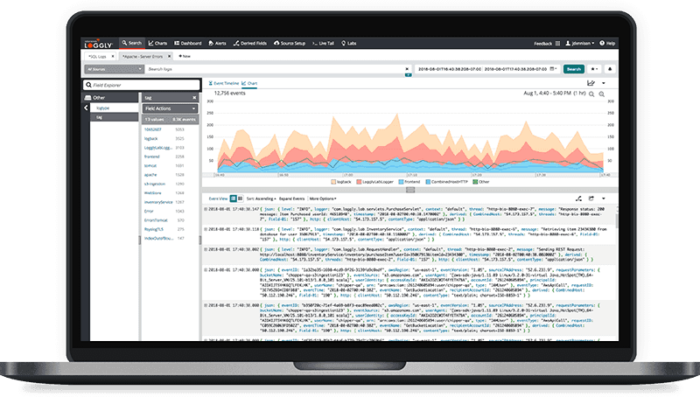
Below is a screenshot showing an example of HTTP request logs provided by a web server by default:
Most web hosting services provide a graphical interface tool for log reporting. The screenshot above shows one such tool. It’s usually accessible from the server’s admin dashboard. With this reporting tool, you can view HTTP status code, URL, and request size, among other data.
You can skip this section if you’re not a programmer. But if you can code, here’s a more detailed explanation of how tracking pixels work and how you can collect and log custom data by yourself.
This time, use this HTML code:
<img src="https://example.com/tracker.php?page=view-item&item-id=12">We assume tracker.php is a PHP file hosted on a web server to which we have admin access. Using the first query string parameter (page=view-item), we can collect data about the current page a user is on. We can also retrieve the ID for the current item the user is viewing using the second query string parameter (item-id=12). This tells us the user is on the item details page and viewing an item with ID 12. You can add more query string parameters to collect more data.
Next, let’s look at the actual PHP code inside tracker.php:
<?php

$page = $_GET['page'];

$itemId = $_GET['item-id'];

$time = time();


$db = new SQLite3("tracking_pixel.db");

// TODO Make sure you create visits_log table first

$sql = "INSERT INTO visits_log(time_visited, page_visited, item_id) VALUES($time, $page, $itemId)";

$db->exec($sql);


// fake returning a GIF since tracking pixel is a 1x1 GIF

header("Content-type: image/gif");

echo base64_decode('iVBORw0KGgoAAAANSUhEUgAAAAEAAAABCAYAAAAfFcSJAAAADUlEQVR42mNk+M9QDwADhgGAWjR9awAAAABJRU5ErkJggg==');
The above code snippet reads data from the tracking pixel. The script logs the data into an SQLite database and returns a one-by-one-pixel GIF image.
At this point, we know what a tracking pixel is and how to set up a simple tracking pixel. Now, let’s look at some common issues with tracking pixel logs and how to troubleshoot them.
Several factors can cause your tracking pixel to not get hits. To fix this issue, check to verify you linked to the tracking pixel correctly in your HTML code.
You should also check your server logs to see if HTTP requests to your tracking pixel return an error code like 404 or 500.
Another option is to wait a bit after initial setup. It may take a while for logs to update.
In most cases, logging hits alone isn’t enough. Servers log a limited amount of data. You can log custom data using URL query string parameters. Another option is to write a custom program using a language like JavaScript. If you’re using an analytics tool, the tool likely comes with a feature to let you specify the data you wish to capture.
Tracking pixels can help you tell how effective your digital marketing efforts are. For example, they can give insight into how many people visited your mailing list sign-up page versus how many people signed up. One way you can measure conversion is by setting up the sign-up page and adding a thank-you page.
To track the conversion rate, set up tracking pixels on both pages. If the tracking pixel records 100 hits for the first page and 50 hits for the thank-you page, that equals a 50% conversion rate.
It’s possible for users to compromise data in tracking pixel logs. For instance, if a user directly loads the thank-you page from our previous example, there’s no way to tell if the user started from the sign-up page or not. However, you can get around this issue by filtering your log data. Include HTTP referrals or a unique value per user in your tracking pixel logs. Using this data, you can determine whether both pages were loaded.
Most analytics tools will have a built-in search feature out of the box.
Setting up a basic tracking pixel is simple and requires no coding experience. All you need to do is copy and paste a single line of HTML to the webpages you want to collect data on. However, it gets more complicated when you need to collect and log more personalized data.
Most of the issues and complexity with tracking pixel logs mentioned in this post can be reduced or eliminated using a log data management solution like SolarWinds® Loggly®. Loggly brings all your logs to one central place where it’s easy to track activities, monitor trends, and troubleshoot issues. As a result, you don’t have to build your own back end from the ground up.
This post was written by Pius Aboyi. Pius is a mobile and web developer with over four years of experience building for the Android platform. He writes code in Java, Kotlin, and PHP. He loves writing about tech and creating how-to tutorials for developers.