Building a ChatOps Bot with Slack and Loggly (Part 1)

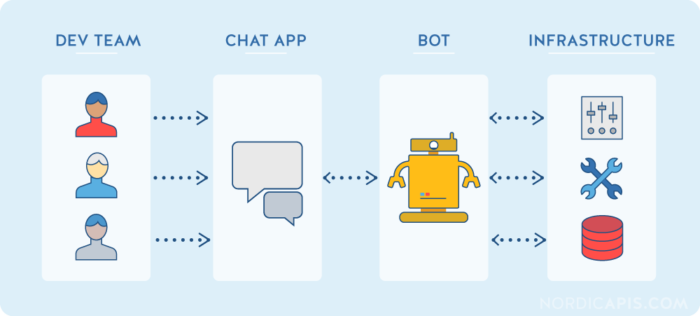
What is ChatOps?
If you don’t know about ChatOps already, the term ChatOps was coined somewhere between 2010 and 2013 by the team at Github when they were creating HUBOT.
If you haven’t heard of ChatOps, don’t worry, there is plenty of information out there on the topic. ChatOps uses a Chatbot, which you have probably used in one way or another, maybe to book a room, to interact with customer service, or to get information in a chat service of your choice. Almost all platforms – from Facebook and Google Hangouts to Twitter, Slack, and others – have Chatbots. Unlike traditional Chatbots or customer service Chatbots, ChatOps is primarily used by the development team to automate tasks throughout the operations infrastructure and the organization.
Here are a few links to get you started if you are not already familiar.
https://www.youtube.com/watch?v=NST3u-GjjFw
https://blogs.atlassian.com/2016/01/what-is-chatops-adoption-guide/
https://www.pagerduty.com/blog/what-is-chatops/
For me, ChatOps came far earlier than 2010. Back in the late Nineties, there was a chat system prior to AOL called IRC (internet relay chat) that I believe is pretty much a replication (some might say a copy) of IRC. Users of IRC and channel operators would develop IRC chat bots to serve files, mp3s, videos, and pirated software, as well as to log or respond to information. A great majority of these IRC bots used a framework called EGGDROP, which was written in a language called TCL (I always pronounced it tickle) and can be found at https://github.com/eggheads/eggdrop. For this project I chose to go in a different direction.
Why Build a ChatOps Bot with Slack and Loggly?
ChatOps help you interactively automate tasks while keeping track of things, and it assists in collaboration between you, your developers, and your team. As your organization grows, more applications are added, and by integrating cloud-based logging into your applications, you end up having a real benefit for being able to monitor things. There are tools for application monitoring, tools for automating development operations, and tools for gathering data and statistics that are readily available.
Unfortunately, while these tools produce a great deal of automation and data, they are not interactive. For groups troubleshooting problems, it makes collaboration difficult without something like ChatOps. In ChatOps, everyone can see the same thing at the same time. It really provides a good way to collaborate with information in a team while automating the integration between systems. Here are just a few example use cases.
Use Cases:
- You are an application developer and need to search for logs in staging/production for your app and are currently within the slack interface.
- Your team is troubleshooting a problem in a Slack channel and you want everyone to see the specific logs around the problem. It is a good way to collaborate when everyone can see the search query and then subsequently update the search to get more specific logs. (With Loggly Live Tail, you can even stream those logs directly to Slack in real time.
- You want to provide the team with the ability to log what they are currently working on easily without dealing with multiple systems.
- You want to monitor a variety of systems interactively and trigger multiple tools and provide an added layer of orchestration.
How to Build a ChatOps Bot with Slack and Loggly
In my quest to build a simple ChatOps bot for Loggly and Slack, I came across a variety of existing frameworks written in a variety of programming languages with a variety of different architectural points of view. At first I thought this might be a good time to pick up a YAL (yet another language) like Go or Lua, but I came to the conclusion that I would rather get something functioning first and then go back later to revise it. I then went to use Python but realized that I could probably get something going rather quickly with Node.js. For better or worse, Node.js has a huge amount of libraries readily available and pretty much works everywhere. Code for this post can be found at https://github.com/trorabaugh/slackerlogglybot.
Existing ChatOps Frameworks
There are a variety of open source coding frameworks available for building your own ChatOps. There are even some non-coding platforms (which I did not test) that you can utilize to build your own ChatOps Bot. Here are a few to look into:
- Hubot: https://hubot.github.com/
- Botkit: https://github.com/howdyai/botkit and https://howdy.ai/botkit
- RTMBot: https://github.com/slackhq/python-rtmbot
- Go: https://github.com/kyokomi/slackbot
- https://github.com/trinchan/slackbot
- https://github.com/macobo/slackbot
- Also search Github for many more…
For this project I selected the Botkit framework because it’s a pretty simplistic framework in terms of the codebase, has few dependencies, and I happen to have a virtual machine lying around with Node.js already installed. I would urge you to take a look at Hubot and others from both the architectural standpoint and because of the general overall support offered by the development community. With Hubot, there is also a Slack library and adapters for other types of messaging platforms. That being said, Botkit was pretty easy to get going.
Requirements for Botkit
- NodeJS +v4.6 – I tried with both v4.6 and v7.4.0
- npm install botkit or git clone git@github.com:howdyai/botkit.git
- npm install winston-loggly
- A Slack team account and bot token
- A Loggly account and customer token
- https://<your_team>.loggly.com/tokens
- Note: If you want an easier method, take a look at the code for this post at https://github.com/trorabaugh/slackerlogglybot
Steps to Getting Started
After you have installed the requirements, first you need to generate some tokens on both Slack and on Loggly. To create a Bot User on Slack:
- Go to https://api.slack.com/bot-users and refer to the section about Custom Bot Users. This will explain how to create a custom bot user via a URL like the following:
- https://<team_name>.slack.com/apps/new/A0F7YS25R-bots
After you walk through the steps, you will be given an API token. Keep the @<name> of your bot as you will need it later on.
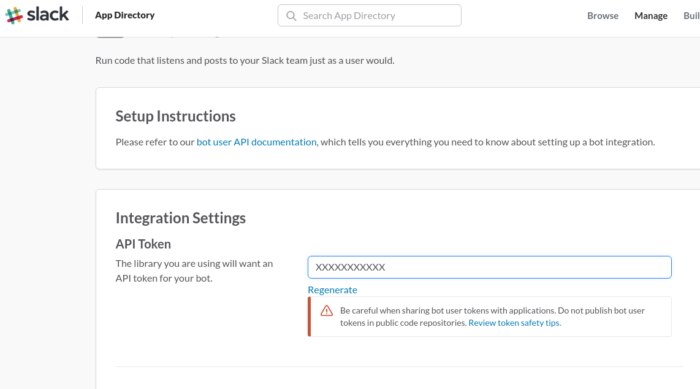
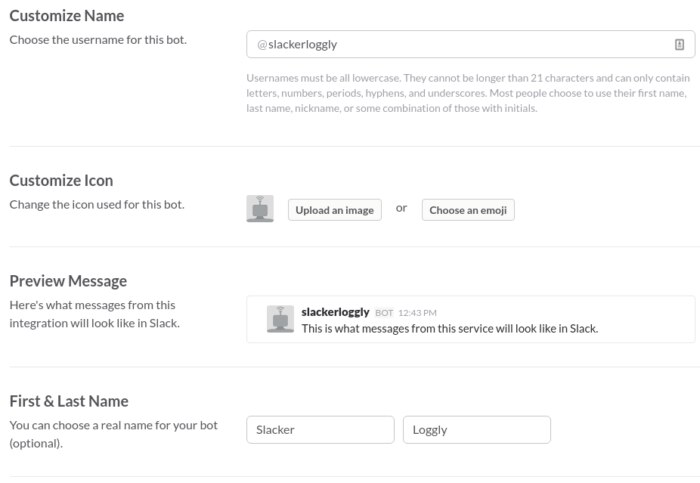
Provide the background information on your bot and give your bot a name just like a regular user and fill out the rest of the information.
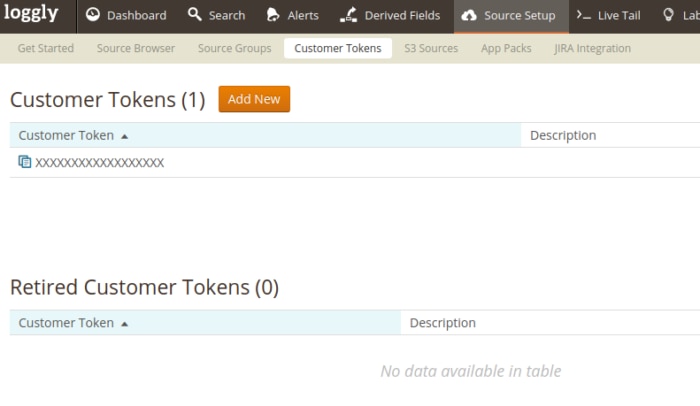
After you have obtained your Slack bot user token, you will need to generate a Loggly API Token. To do this log in to your Loggly account at https://<your_team>.loggly.com/tokens and generate a new customer token. The screen will look like this:
Now that you have the basic requirements setup, I would recommend reading through the documentation on Botkit a little bit and taking a look at https://github.com/trorabaugh/slackerlogglybot
Some Light Reading
https://github.com/howdyai/botkit
This will help you understand a little bit about how the bot works. Without going into a huge amount of detail, the bot “hears” specific phrases that match with code that runs.
Steps to Getting Started Integrating Loggly and Slack
By now you should have your tokens and a basic environment setup either by cloning or installing Botkit, or if you want a simpler method, just clone the code repo at https://github.com/trorabaugh/slackerlogglybot and run npm install as it will install all necessary dependencies. Then update the /lib/botconfig.js with the appropriate tokens and authentication information.
In the main directory of Botkit there is a slack_bot.js. First try to test your Slack API token with the slack_bot.js file to see if it works. You do this by running:
~/workspace (master) $ token="<your_slack_token>" node slack_bot.js
Or if you are using the slackerloggly bot, edit your lib/botconfig.js and then run:
~/workspace (master) $ node slack_bot.js
At this point you should see some information about the connection to Slack, which looks something like:
info: ** No persistent storage method specified! Data may be lost when process shuts down.

debug: Setting up a handler for spawned

debug: Setting up a handler for heard_trigger

debug: Setting up a handler for command_triggered

debug: Setting up a handler for remote_command_end

info: ** Setting up custom handlers for processing Slack messages

debug: Setting up a handler for message_received

debug: No handler for stats:spawned

debug: rtm.start { no_unreads: true,

simple_latest: true,

token: 'XXXXXX' }

info: ** API CALL: https://slack.com/api/rtm.start
You should next be able to invite your Slackbot to a channel of choice within Slack and start testing it out. Try asking the bot “What is your name?”

How to Search Loggly
To query Loggly we need to use a few Node.js libraries so that we can communicate over HTTPS to facilitate querying Loggly’s API. Loggly’s query API requires two different requests. See the following for a few examples:
https://www-staging.loggly.com/docs/api-retrieving-data/
The first request is to create a search request which is sent to the Loggly search API at /apiv2/search?q=<terms> and will return a JSON data structure providing something like the following:
{

"rsid": {

"status": "SCHEDULED",

"date_from": 1374686593000,

"elapsed_time": 0.01730203628540039,

"date_to": 1375550593000,

"id": " 728480292

}

}
After we have obtained the job search result ID we will need to query the events API path with the ID in red above to obtain the search results. So we need to send a request to the events API with the ID highlighted above. /apiv2/events?rsid=728480292
To query the search and events API, add the following to the top of <yourbotname>_bot.js:
const https = require('https');

const querystring = require('querystring');
var searchOptions = {

hostname: ‘<yourloggly_subdomain>.loggly.com',

port: 443,

method: 'GET',

auth:"<loggly_user_name>:<loggly_password>"

};

var eventOptions = {

hostname: ‘<yourloggly_subdomain>.loggly.com',

port: 443,

method: 'GET',

auth:"<loggly_user_name>:<loggly_password>"

};
Next in the rest of your script add the following code:
controller.hears(['search'], 'direct_message,direct_mention,mention', function(bot, message) {

var searchString = message.text.replace(/^search /,'');

var origSearchMessage = message.text.replace(/^search /,'');

searchString = querystring.escape(searchString);

searchOptions.path = '/apiv2/search?q=';

searchOptions.path += searchString;

searchOptions.path += '&from=-2h&until=now&size=10';

console.log('Request Search Path', searchOptions);

var req = https.request(searchOptions, (res) => {

//console.log('statusCode: ', res.statusCode);

//console.log('headers: ', res.headers);

res.on('data', (d) => {

//process.stdout.write(d);

var searchDataResp = JSON.parse(d);

console.log('Search Data Resp', searchDataResp);

console.log('RSID EventID', searchDataResp.rsid.id);

eventOptions.path = '/apiv2/events?rsid=';

eventOptions.path += searchDataResp.rsid.id;

console.log('Request Event Path', eventOptions);

var req2 = https.request(eventOptions, (res) => {

//console.log('statusCode: ', res.statusCode);

//console.log('headers: ', res.headers);

res.on('data', (eventData) => {

bot.reply(message, "Events Found for '" + origSearchMessage + "'");

var eventDataResp = JSON.parse(eventData);

console.log('getLogglyEventData', eventDataResp);

var totalEvents = eventDataResp.total_events;

var eventsList = eventDataResp.events;

console.log(eventsList);

bot.reply(message, JSON.stringify(eventDataResp, null, 4));

});

});

req2.end();

req2.on('error', (e) => {

console.error(e);

});

});

});

req.end();

req.on('error', (e) => {

console.error(e);

});

});
Right now the output sent back to Slack for the search results isn’t pretty as it produces JSON that is formatted versus displaying a nice pretty table but we can worry about cleaning up the way it displays within Slack later. We can also add a variety of custom parameters to the command like how much time to search, tags, and anything that the Loggly search endpoint accepts.
How to Use Loggly Live Tail for ChatOps
With Loggly, you also have a quick solution that doesn’t require you to dive directly into code and provides immediate log visibility in Slack until you get your ChatOps bot up and running. With Loggly Live Tail (an Enterprise feature), you can create a Slack channel specifically for your log data. Your logs will display in a similar way as a tail -f would from a Linux command line.
Live Tail uses a command line utility where the output is sent directly into Slack. The documentation gives you directions for using the Slack webhook API to send your data. All it requires is a few small installations of tools and some configurations.
ChatOps Wrap-Up
As seen above commands are sent to bots generally in the following order:
@<your_bot_name> <command> <action>
You can customize the way that the bot “hears” a command by using regular expressions or extend the way that commands and actions are found.
@<your_bot_name> search <message_to_search_for>
Here is a simple example:
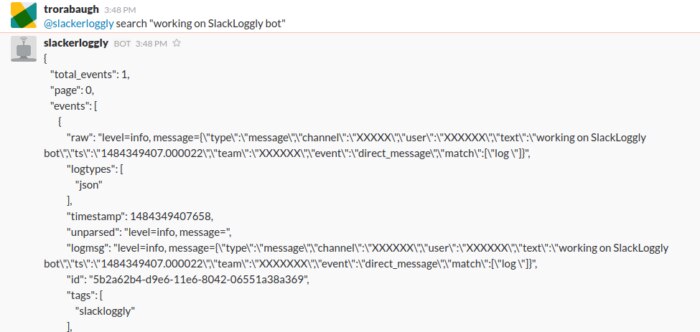
One note about real-time logging and searching in Loggly. If you immediately log and then search right afterwards, you may not find the event. It takes a little bit of time for the event to be made available to be searched. This shouldn’t be a big problem if you are simply logging and then searching a second or two later.
Wrapping It Up
There are a ton of other automated tasks that you can do using ChatOps, whether it is for automating deployment or even logging what tasks your team is doing and where. In our next post, we will work on having the ChatOps bot log messages when spoken to. For more information, check out the code repo at https://github.com/trorabaugh/slackerlogglybot.
About Tyler Rorabaugh
So how did I end getting into ChatOps? As a kid, I played a lot with IRC and created bots using Eggdrop and Perl that did a variety of interesting things. I guess technological ideas seem to repeat themselves because it seems today, social networks and collaboration platforms are a lot like IRC. I’ve held a variety of positions in my career ranging from consulting, management, software engineering, dumpster diving, living in a data center on a cot, and helping startups.
My passion has always been about automating things and making things easier to use. I am a hands-on developer and manager with around twelve years or so in the cyber security industry trying to develop risk and threat management products and solutions. I have around sixteen years in total managing teams, developing and coding software applications, and creating patents using a variety of different technologies and programming languages. I have worked with a wide range of company sizes, startups, fortune 500, and government systems. All of that fancy stuff being said…I still consider myself a N00b…
The Loggly and SolarWinds trademarks, service marks, and logos are the exclusive property of SolarWinds Worldwide, LLC or its affiliates. All other trademarks are the property of their respective owners.

Tyler Rorabaugh
