Best Practices for Client-Side Logging and Error Handling in React

Logging is an essential part of development. While working on React projects, logging provides a way to get feedback and information about what’s happening within the running code. However, once an app or website is deployed into production, the default console provides no way to continue benefiting from logs.
Since these logs are client-side, all errors experienced by users will be lost in their own browsers. This means that the only way we can find out about errors in our application is by user reports, which often don’t happen; many users will simply leave rather than filling out a bug report. Therefore, good user experience relies on errors being reported without user intervention, which is a feature that the default console lacks. In this article, we will discuss ways to handle logging for capturing usage and error data in a React app.

Sending JSON Logs with Loglevel
One way to improve our logging capabilities is by using a client-side logging library such as loglevel. Loglevel replaces the typical console.log with features for level-based logging and filtering, which provide a lot more control over your logs.
Furthermore, by using a plugin such as loglevel-plugin-remote, these advanced logs can be sent remotely to a server for storage, analysis, and alerts. By sending JSON data with this method, rather than plain text, we can maintain a data structure with our logs that can easily be sorted and organized.
Here’s a simple example of using loglevel with loglevel-plugin-remote to send logs containing JSON data including the message, level, and stacktrace:
import log from 'loglevel';
import remote from 'loglevel-plugin-remote';

const customJSON = log => ({
 msg: log.message,
 level: log.level.label,
 stacktrace: log.stacktrace
});

remote.apply(log, { format: customJSON, url: '/logger' });

log.enableAll();

log.info('Message one');
log.warn('Message two');
This example will POST all logged data to the “/logger” endpoint on your application URL, requiring you to set up a back-end server to handle this endpoint. There are many other configuration options available in loglevel-plugin-remote, such as intervals for POSTing and API tokens if applicable. The only downside of this method is that you must set up your server to receive, store, and organize these logs, which may require writing a lot of additional code on the back end. Alternatively, you can use a logging service to handle the back end for you.
Handling Errors in React with Error Boundaries
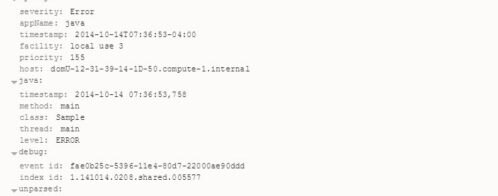
Error boundaries are components which catch errors in your JavaScript application to activate handler logic and render a fallback UI instead of crashing the entire component tree. These were introduced in React 16 and provide a way to handle errors much more effectively. Below is an example of a React error boundary implementing loglevel. When rendered, this component will catch all errors from its entire child tree and send logs to the /logger URL, which should be received by your server.
import React, { Component } from 'react';
import log from 'loglevel';
import remote from 'loglevel-plugin-remote';

const customJSON = log => ({
msg: log.message,
level: log.level.label,
stacktrace: log.stacktrace
});

remote.apply(log, { format: customJSON, url: '/logger' });
log.enableAll();

class ErrorBoundary extends Component {
 constructor(props) {
  super(props);
  this.state = { hasError: false };
}

static getDerivedStateFromError(error) {
  // Update state so the next render will show the fallback UI.
  return { hasError: true };
}

componentDidCatch(error, info) {
  // log the error to our server with loglevel
  log.error({ error, info });
}

render() {
 if (this.state.hasError) {
  // You can render any custom fallback UI
  return <h1>Something went wrong.</h1>;
 }

 return this.props.children;
}
}

export default ErrorBoundary;
More Efficient Logging with Loggly
While the previous examples are great for rolling your own logging service, they require a lot of extra work on the back end to effectively use your logs. SolarWinds® Loggly® is a powerful platform for managing all of your across apps and users. Loggly provides tools for effectively sorting through logs, monitoring your apps with alerts, creating custom dashboards for your specific needs, and much more.
With Loggly, you can also easily combine logs from multiple points in your infrastructure. This unification is essential for managing apps at scale. This is useful for more than just error handling; with Loggly, it’s easy to capture usage data from your users for marketing, conversion tracking, and learning what your users like or dislike about your app. You can also track site traffic without ad blocker interference and respond to capacity problems as traffic scales.
Using Loggly in React
Loggly provides a simple SDK for interacting with their logging platform. Similar to loglevel, you simply need to drop in the new logger and start logging with it. First, start by creating a separate file such as “logger.js” to initialize a new instance of the Loggly tracker. Then, use this logger in the error boundary we created earlier to start sending logs to Loggly. By keeping the instance in a separate file, it can easily be imported across your application. Note that in this example, we have installed the SDK via npm rather than adding it as a script tag in the HTML as the Loggly documentation shows. This allows us to benefit from the package management features of npm.
Logger.js
import { LogglyTracker } from 'loggly-jslogger';

const logger = new LogglyTracker();

logger.push({ 'logglyKey': 'YOUR CUSTOMER TOKEN HERE' });

export default logger;
Error Boundary Component
import React, { Component } from 'react';
import logger from './logger';

class ErrorBoundary extends Component {
 constructor(props) {
  super(props);
this.state = { hasError: false };
}

static getDerivedStateFromError(error) {
  // Update state so the next render will show the fallback UI.
  return { hasError: true };
}

componentDidCatch(error, info) {
  // log the error to loggly
  logger.push({ error, info });
}

render() {
if (this.state.hasError) {
  // You can render any custom fallback UI
  return <h1>Something went wrong.</h1>;
 }

 return this.props.children;
 }
}

export default ErrorBoundary;
Example: Tracking Page View Time
Besides tracking errors with error boundaries, it’s also useful to know which pages are being viewed and interacted with in your application. Using the same logger.js import we created before, we can easily drop this into component lifecycle methods like componentDidMount and componentWillUnmount to see when components are being loaded and removed. This would handle routes, pop ups, and other components which a user brings into view, but for external links you’ll need to use onClick handlers.
For example, let’s assume we have a page listing service for our product, and we want to see how long users are spending on this page. By creating a simple time calculation on mount and logging it on componentWillUnmount, we can keep track of this information:
import React, { Component } from 'react';
import logger from './logger';

let startDate;

class ServicesPage extends Component {

 componentDidMount() {
   // initialize the start date on page load
   startDate = new Date();
}

 componentWillUnmount() {
   // calculate the time since we loaded this page
   const timeSinceLoad = (new Date().getTime() - startDate.getTime()) / 1000

   // log it to Loggly!
   logger.push({
   tag: 'pagetime', // add a custom tag for sorting
   pageName: 'Services' // the name of this page for sorting
   timeSpentInSec: timeSinceLoad
  });
}

render() {
  return …
 }

}
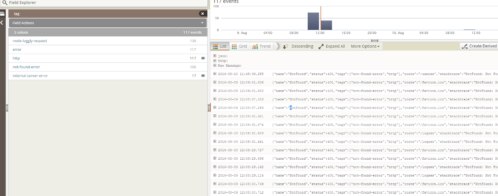
This chart shows average page view time of multiple pages on a website. After including the “pageName” field in the JSON log data, we set “Split by” to “json.pageName” to get a color-coded chart showing a comparison of all pages.
Conclusion
Logging is absolutely essential for building a successful application with a great user experience. In this article, we discussed methods of improving the default console logger, sending logs to a server, building error boundaries in React, and integrating all of these concepts with Loggly for a robust logging solution. Once you’ve initialized Loggly’s simple SDK, you can use it across your React app to easily keep track of errors and user interaction. Sign up for a free 14-day trial of SolarWinds® Loggly® and start analyzing client-side logs and usage patterns in your application.
The Loggly and SolarWinds trademarks, service marks, and logos are the exclusive property of SolarWinds Worldwide, LLC or its affiliates. All other trademarks are the property of their respective owners.

Michael Auderer