How to automate application stats through Loggly using Built.io® Flow™
Automating DevOps processes plays a crucial role in speeding up tasks, reducing manual errors, and increasing productivity within a business. The DevOps team is responsible for gathering various system and application performance metrics from the production environment. System-level performance metrics are typically collected by the monitoring tools, whereas application performance metrics can be easily derived from application logs.
Tools of the trade
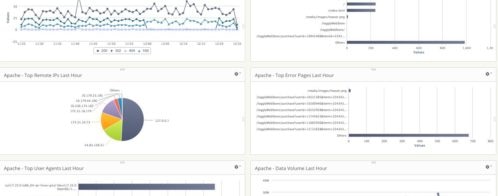
Loggly is a hugely popular tool amongst those of us in DevOps. A log management solution, Loggly helps the team view metrics and dig into details by searching the logs from multiple systems from a single location.
A lesser known tool that you’ll want in your DevOps tool belt is Built.io® Flow™. Built.io Flow is an integration Platform-as-a-Service (iPaaS) that enables automation by connecting tools, systems, devices, and services via drag and drop and requires no/low coding skills.
A real use case: Loggly + Built.io
When combined with Loggly, Built.io Flow provides my team with the ability to integrate this search with Loggly, process the search results, and automate them as needed.
This article will demonstrate how to automate the collection of various application statistics through Loggly using Built.io Flow. The stats I collect include the total number of events that have occurred in an application over a specific duration; let’s use the last 24 hours as an example.
By automating this report, I save considerable time and can quickly provide my company with a snapshot of what’s going on with our users. In short, this automation helps everyone stay on the same page.
Assumptions
- A Loggly account
- A Built.io® Flow Enterprise™ account
- Familiarity with basic search patterns in Loggly
- Familiarity with Built.io Flow Enterprise basics
Logic
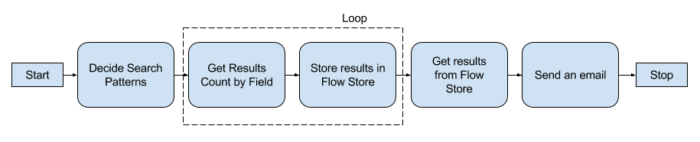
Here is the initial logic for this workflow. Note that it can be modified as needed.
Building the workflow
In this workflow, you will implement a semi-complex system that includes some iteration. Suppose you have a SaaS application in which users can create and update their own applications or import applications from other users.
The following are processes that will be implemented:
- Retrieve the total number of events over the last 24 hours tracking when a user has imported the application successfully, and list the top 10 application IDs that were imported. These are events that are logged to Loggly.
- Retrieve the total number of events over the last 24 hours tracking when applications were updated by a user, and list the 10 user IDs carrying out the highest number of application updates.
Here are the steps to build the workflow:
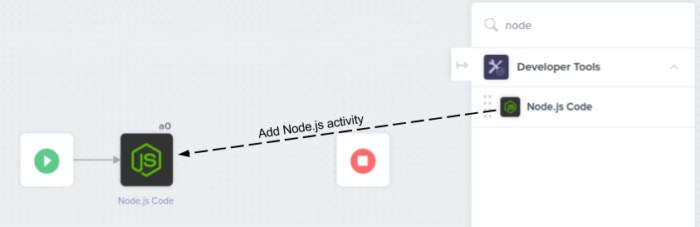
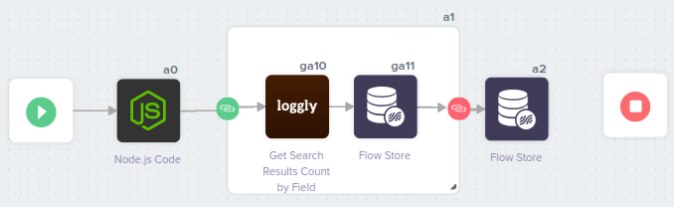
Step 1: Start with a blank canvas in Built.io Flow Enterprise. Add the Node.js Code action from the Utility > Developer Tools section in the panel on the right, and connect it to the Play button.
Step 2: This action contains the desired search patterns that will help retrieve the application stats we will use. The code below is what is inside the action:
var base_query=’tag:my-log-tag-* AND “my_log_message“:’
var search_patterns= [{query:base_query+”user imported application successfully“, name:’total_imports‘}, { query: base_query+”user updated application successfully“, name:’total_updates‘ }]
var top_app_fields= [{group_by_field:”json.app_id“, name:’top_10_apps‘},{group_by_field:”json.user_id“, name:’top_10_users‘}]
var output= { ‘search_patterns’: search_patterns, ‘top_app_fields’: top_app_fields }
$export(null, { done : output });
The fields in bold are specific to your application.
The base_query variable contains the name of the log file (tag) and the name of the field (my_log_message) that will be queried. If there are multiple log files to be queried, then you can specify them in the search_patterns variable.
The search_patterns variable offers different search patterns and it may contain the same or different log files (tag) as appropriate.
The top_app_fields variable contains the fields that are in each log message. This variable will group and sort the messages based on the frequency with which the field appears. As a result, you will be able to select the top 10 apps if the group_by field specified is the app_id. The search pattern required can be the same as the patterns mentioned above.
You will format the data in the output variable and pass it to the next action using the custom $export() function.
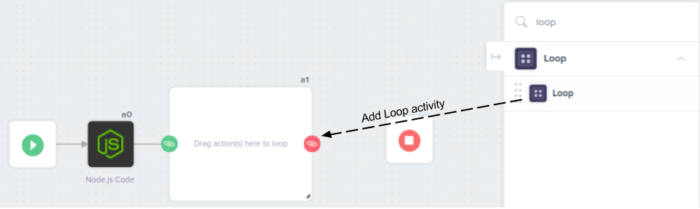
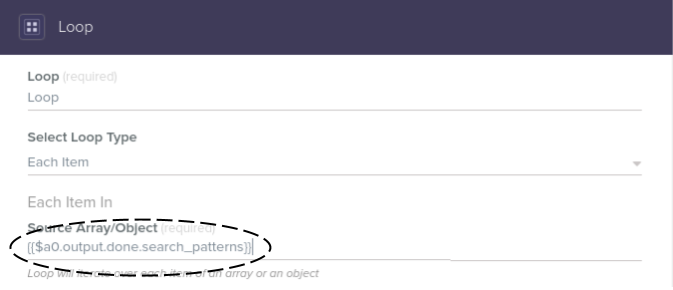
Step 3: Add a Loop from the Loop section and connect it to the Node.js Code block. Use the following settings for the Loop:
- In the Select Loop Type dropdown, select the Each Item option.
- For Source Array/Object, use the following:
{{$a0.output.done.search_patterns}}
where, a0 is the activity ID of the Node.js Code action.
Note: Use the keyboard shortcut (Shift + i) to see activity IDs of all the actions on canvas.
Step 4: Now, add the Get Search Results Count by Field action from Loggly and place it inside the Loop. Connect the Loggly action to the start point of the Loop on the left.
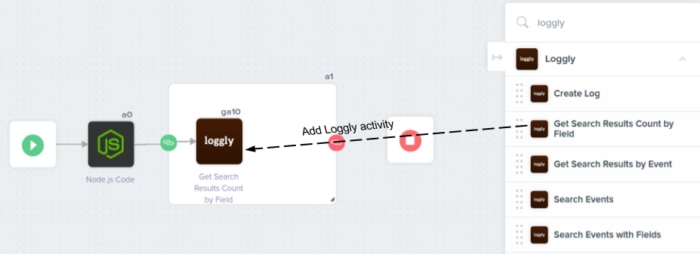
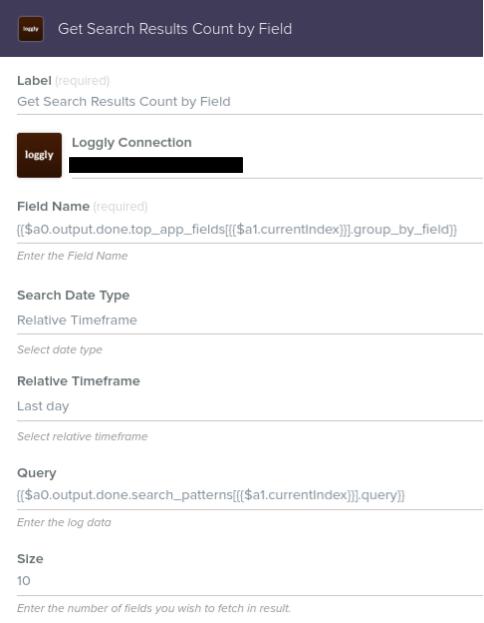
Step 5: Edit the settings for the Loggly action as follows:
- Label – You can use your custom label, or leave it set to the default (i.e. “Get Search Results Count by Field”).
- Loggly Connection – Select an existing Loggly Connection, or add a new one if you don’t have an existing authentication. A new Loggly Connection will require the following input parameters:
- Connection Label – Provide a custom name for your connection (e.g., my-loggly-conn)
- Account Subdomain Name – Loggly Endpoint for your account (e.g., https://mycompany.loggly.com)
- User Name – Loggly Username
- User Password – Loggly Password
- Custom Token – You will need the Loggly customer token in this field. This token is required if you plan to send the log data to Loggly using this connection.
- Field Name – The log messages will be grouped by this field. Set the value as follows:{{$a0.output.done.top_app_fields[{{$a1.currentIndex}}].group_by_field}}Here, a1 is the action ID of the Loop and $a1.currentIndex consists of the current index number of the object/array being iterated in the Loop (for us, it is search_patterns).
- Search Date Type – Select Relative Timeframe for Search Date Type.
- Relative Timeframe – Select Last Day for Relative Timeframe. That means, you will be retrieving application stats from Loggly for the last 24 hours.
- Query – Click Show Optional Fields, and the Query field will look like this:
{{$a0.output.done.search_patterns[{{$a1.currentIndex}}].query}} - Size – The Size is the number of records to be fetched for the log messages. As the top 10 applications and users are to be retrieved, you will set the size as 10.
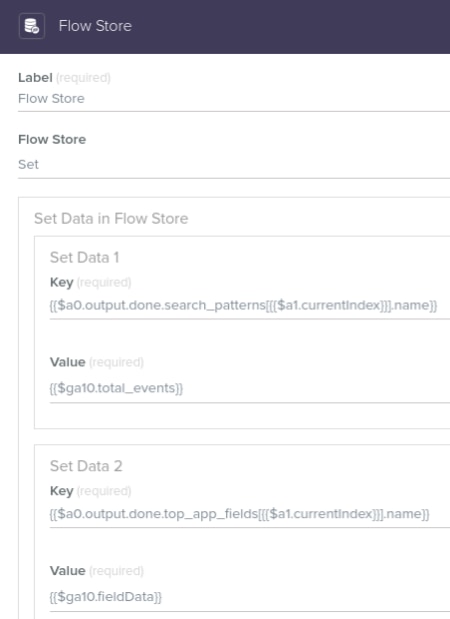
Step 6: Add Flow Store from the Developer tools section and place it inside the Loop along side the Loggly action. Connect it to the Loggly action on the left and connect it to the end of the Loop on the right. This action is used to store the data that is retrieved from Loggly. The data is stored in key-value pairs and is accessible outside of the Loop.
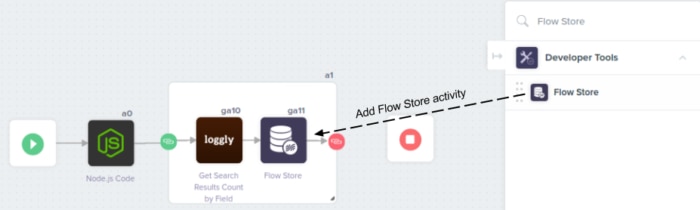
Step 7: Use the following settings for the Flow Store action:
- Label – You can use your custom label, or leave it set to the default (i.e. “Flow Store”).
- Flow Store – Select the Flow Store as Set.
- You will add the following four key-value pairs:
- For total_imports and total_updates over last 24 hours:
Key: {{$a0.output.done.search_patterns[{{$a1.currentIndex}}].name}}
Value: {{$ga10.total_events}}
where, ga10 is the ID of the Loggly action. - Click Add to set two more key-value pairs.
- For top_10_apps and top_10_users over the last 24 hours:
Key: {{$a0.output.done.top_app_fields[{{$a1.currentIndex}}].name}}
Value: {{$ga10.fieldData}}
- For total_imports and total_updates over last 24 hours:
Step 8: Add one more Flow Store action outside of the Loop. In the previous Flow Store, all required values are set. Now you need to retrieve those key-value pairs. Connect this Flow Store action with the Loop.
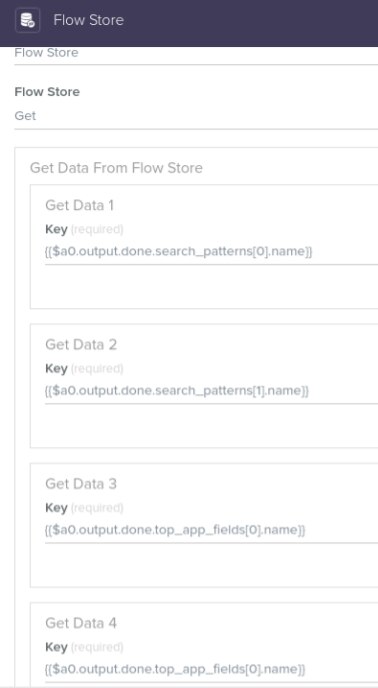
Step 9: Use the settings below for Flow Store action:
- Flow Store – Set the Flow Store as Get.
- For Get Data 1, Key will be:
{{$a0.output.done.search_patterns[0].name}} - Click Add to get one more Key.
- For Get Data 2, Key will be:
{{$a0.output.done.search_patterns[1].name}} - Similarly, for Get Data 3 and 4, Key will be as follows:
Get Data 3 Key:
{{$a0.output.done.top_app_fields[0].name}}
Get Data 4 Key:
{{$a0.output.done.top_app_fields[1].name}}
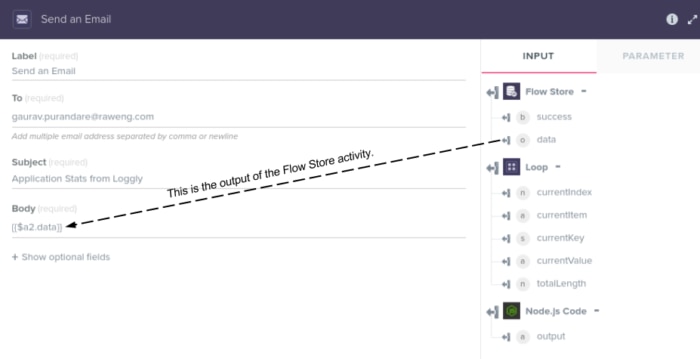
Step 10: Add Send an Email action from the Notification section, and connect it to the Flow Store. Also, connect this action to the stop as this is the final step in this workflow.
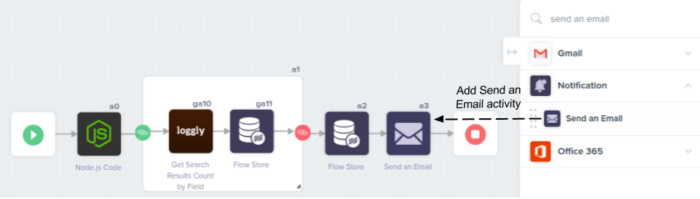
Step 11: Use the settings below for the Send an Email action:
- Enter the appropriate recipient(s) for the email notification.
- Set your ‘Subject’ for the email (e.g., Daily Application Summary).
- The value for the email body will be as follows:
{{$a2.data}}
where ‘a2’ is the ID for the last Flow Store. This variable will have a set of key-value pairs retrieved from the Flow Store action. You can customize the email body format at any time.
Step 12: Save the workflow.
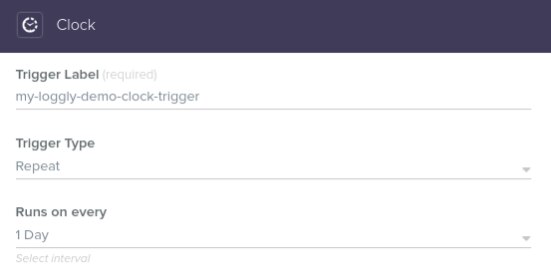
Step 13: Now that you’ve built the workflow, you can manually run it to ensure there are no errors. For this, you need to add a trigger:
- Click the Settings icon on the Play action.
- Select or Search the Clock from the list of available triggers.
- Select an existing schedule for the Clock trigger or create a new event for it.
- Trigger Label – Add a custom label to the Clock trigger.
- Trigger Type – Select Trigger Type as Repeat.
- Runs on every – Select frequency to run as 1 Day.
- Save the Clock trigger.
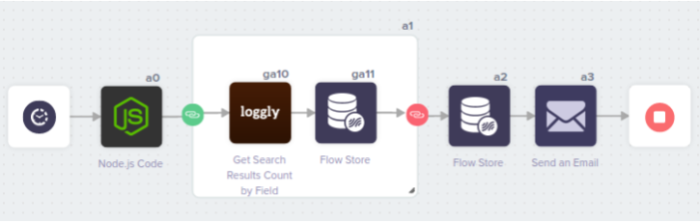
Your completed workflow should look as follows:
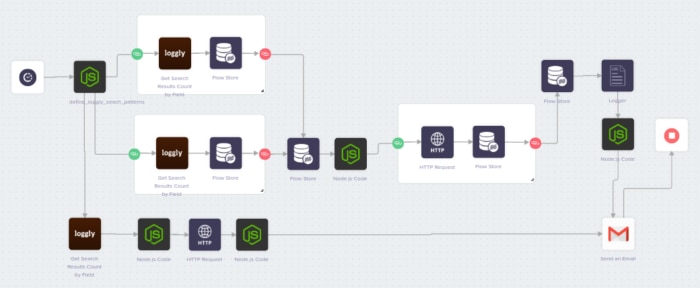
The logic involved in this example can be developed and extended as appropriate. Through this approach, you can track various user activities and application events.
The following workflow is based on similar logic, with additional parameters and conditions added to match it with the application usage requirements in the production environment:
Conclusion
Loggly provides a great interface to analyze diverse application logs from various systems. Built.io Flow helps process the search results obtained from Loggly. Combining Built.io Flow and Loggly is a perfect alternative to analytics tools.
This implementation has helped us automate getting a daily overview of production applications so that everyone is aware of how many workflows were run on our platform and how many were successful, failed, or stopped by a user.
Getting these reports from production helps the executive team draw meaningful insights from what’s going on with our customers so they can determine which business strategies to pursue. Put simply, automating this process provides direct value to the company.
If you try combining Loggly and Built.io Flow, let me know in the comments or ping me at @builtio. You can also follow me at @purandaregm555.
The Loggly and SolarWinds trademarks, service marks, and logos are the exclusive property of SolarWinds Worldwide, LLC or its affiliates. All other trademarks are the property of their respective owners.

Gaurav Purandare Gaurav Purandare is Principal Architect at Built.io, a technology provider with solutions that enable organizations to quickly create, integrate, and scale apps across web, mobile, and IoT. His passion for architecting cloud applications pairs with his years of experience managing and operating multi-tier, highly available applications. Gaurav is a certified AWS Solution Architect – Associate level and also holds certified MPN Competency for Microsoft Azure.