Working With the WordPress REST API
Two Ways to Log Activity
Logging is an important part of every software application. In addition to capturing user activity, well-structured logs can make it easier to debug problems should they occur. But if your application is split up across several different subsystems, collecting and analyzing disparate logs can be a real challenge.
Picture this scenario: You work at a startup that uses a CMS managed by a few admins. You also have a standalone front-end application for users to communicate with your platform via an API. Because you believe in the importance of logging, you know you should log the activity of both applications. But how can you manage the logs generated in these two different locations? And where should you store the logs?
The best way to consolidate the logs from both applications is to send them to a common service. That’s where SolarWinds® Loggly® comes in. By following a simple design pattern, all the logs sent into Loggly can be captured consistently. You can then search, analyze, and parse the logs as though they came from a single location.
In this post, we’ll look at how to implement the code that brings this idea to life. We’ll use WordPress as our CMS platform, and we’ll build a small Node.js app to act as our front-end service calling the WordPress REST API. Loggly integrates with several services and programming languages, and we’ll see how easy it is to combine logs generated from several sources.
Prerequisites
When it comes to running WordPress, you have two options:
- You can download and install the necessary dependencies to have a local install.
- You can create an account on WordPress.com to work with an existing hosting solution.
No matter which way you’re interacting with the WordPress platform, the steps to pair it with Loggly are the same. You should also have the Basic Authentication plugin installed and activated.
Since our front-end app is going to be written in Node, make sure you have a relatively recent version installed; anything after Node 12.0 should be fine.
Next, you can clone the repo which contains the full source code for our front-end application and run npm install to fetch all the dependencies. We’ll go into the specifics of this app more carefully below, but there’s one very important action to call out before then. Since the WordPress API requires authentication, we need to pass in our site’s credentials to interact with it. However, we don’t want to check our username and password into source control. The solution for this is to use the dotenv npm package. Create a file called .env in your freshly cloned repository and provide the values for your site’s WordPress URL, your username, and password.
WP_URL=<URL>
WP_USER=<USERNAME>
WP_PASS=<PASSWORD>
This file is not checked into source control. Instead, our code calls dotenv, which reads this file and creates environment variables from the key-value pairs. We can then create a client to call out to the WordPress API without exposing our password.
var WPAPI = require("wpapi/superagent");
var wp = new WPAPI({
 endpoint: `${process.env.WP_URL}/wp-json`,
 username: process.env.WP_USER,
 password: process.env.WP_PASS,
});
For more information on why we do it this way, check out the Twelve-Factor App’s guide on storing configuration data.
Next, start the app by running node server.js on the command line, and navigate to http://localhost:3000 in your browser. You should see a list of your 10 most recent posts, as well as an HTML form to create a new post. Our site’s design won’t win any awards, but this little app is enough to demonstrate how we can fetch posts from WordPress and create new ones. In the form at the bottom of the page, fill in the title and body fields to create a new draft.

After you click Create, your new post will be created in WordPress, and the list of your ten most recent posts will be updated in real time.
Adding Logging to WordPress
Now that we know the WordPress site can have new content written by both platform admins and users of this separate front-end application, it’s time to add some logging capabilities. Let’s look at how we do this in WordPress first.
One of the more popular plugins for adding sophisticated logging to your WordPress installation is WP Activity Log. In addition to logging user activity, the WP Activity Log plugin can log the activities of any installed plugins. Most importantly, however, the WP Activity Log plugin lets you send generated logs to a third-party service. This mirroring allows us to collate all our logs in one place—in this case, Loggly.
The plugin’s documentation provides step-by-step instructions for how to send your logs to Loggly. This process is broken down into two broad steps:
- Provide the WP Activity Log plugin with a customer token from Loggly.
- After that connection is established, configure the plugin to send its logs to Loggly.
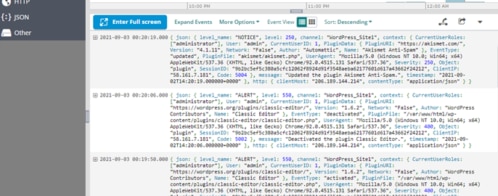
The entire process takes a few minutes. Once it’s done, you can test it by creating a new post. In the Loggly dashboard, you should see a new log entry appear.
{ json: { level_name: "INFO", level: 200, context: { User: "testing-loggly", PostType: "post", EventType: "created", PostTitle: "testing", PostID: 3282, CurrentUserRoles: ["administrator"], CurrentUserID: 1, message: "Created the post testing.", timestamp: "2021-09-22T01:48:23.000000+0000" } }Next, you can perform all kinds of administrative activities in WordPress. Each one will appear in Loggly as a JSON entry, with information about the event as well as the log entry’s severity.
Logging in the Front-End Application
With WordPress logging sorted out, it’s time to move on to the front-end application.
Loggly has a variety of SDKs for several programming languages, including Node.js. The loggly npm package allows you to call out to the Loggly API seamlessly. To configure it, we need to provide some authorization information, similar to the way we initiated the WordPress plugin.
const loggly = require("loggly").createClient({
 token: process.env.LOGGLY_TOKEN,
 subdomain: process.env.LOGGLY_SUBDOMAIN,
 auth: {
   username: process.env.LOGGLY_USER,
   password: process.env.LOGGLY_PASS,
 },
});
Since our customer tokens—and certainly the username and password—are considered sensitive information, we’ll also store those in our .env file. Next, we can insert a logging statement and see what happens. Let’s add the following line in our POST /create function:
loggly.log("A new post was created from the client app!");Create a new post in the front-end application. After you’re done, navigate to Loggly. As you might expect, a new log entry appears. It will look something like this:
A new post was created from the client app!
{ http: { clientHost: "125.14.13.117", contentType: "text/plain" } }
Why isn’t this as detailed as the information provided by the WP Activity Log plugin? Well, as a wise person once said, “With great power comes great responsibility.” Logging in the front-end application gives you total control over all the information sent to Loggly. You are responsible for deciding what information is important enough to log.
To address this, we’ll make two changes. First, add the line json: true when creating the Loggly client.
const loggly = require("loggly").createClient({
 token: process.env.LOGGLY_TOKEN,
 subdomain: process.env.LOGGLY_SUBDOMAIN,
 auth: {
   username: process.env.LOGGLY_USER,
   password: process.env.LOGGLY_PASS,
 },
 json: true,
});
By default, the Loggly client will pass on logs as strings, and this instructs it to account for complex JSON data structures.
Second—and most importantly—we should send a JSON structure over to Loggly, rather than a plain string message. There are a few ways to implement this, but the easiest way to guarantee a consistent logging format is to create some kind of reusable helper. For example, let’s replace our previous logging line with this:
logglyFormatter("A new post was created from the client app!", {
   level_name: "INFO",
   path: "POST /create",
   User: "frontend",
 });
We’ll define the logglyFormatter function:
{ json: { level_name: "INFO", context: { path: "POST /create", User: "frontend" }, message: "A new post was created from the client app!" }, http: { clientHost: "125.14.13.117", contentType: "application/json" } }Working With Aggregated Logs in Loggly
With both sites sending their logs to Loggly, we can search, filter, and analyze the aggregated results. Let’s look at how we can do this.
Loggly provides a powerful search syntax we can use to demonstrate the importance of gathering logs together. For example, at the top of the log explorer dashboard, enter the following search query:
json.level_name:infoAs you might expect, this can be used to show the log entries generated by both WordPress and our front-end app, but the results are filtered to show only those with a level_name set to info.
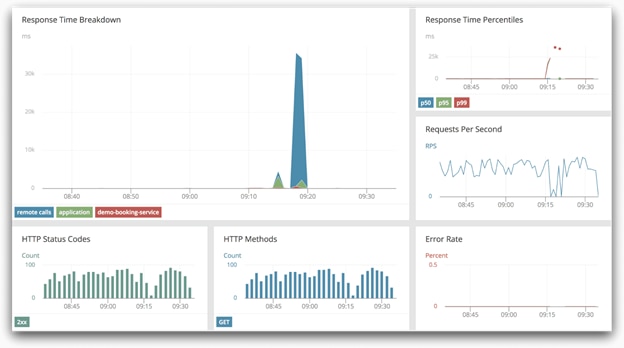
Another advantage of structured logs is their ability to gather activity metrics. Alongside the text contents of your logs, Loggly provides a graph showing the timestamps and frequency of your logs. You can slice this data according to what matters most: the number of errors, the number of posts created over a given time, whether more people are logging in through WordPress or the front-end app, and so on.
Log aggregation helps you organize all activity occurring in your apps. To take full advantage of this structure, you’ll need to step back and identify which data sets are most relevant to you. It might be important to you to keep track of the names of users creating posts. In that case, you’ll need to provide the data when logging activity through the front-end app. When in doubt, always track more information than less!
Learning More
With logs consolidated in one place, you can parse through the entries with ease. But this is only the beginning of your logging aggregation. You would also want to send logs from your other infrastructure components—such as the database or the webserver—to get a full picture of how data and activity move through your apps.
To learn some more best practices for logging in Node.js, check out our guide on more practical production-grade configurations you can adopt. Happy logging!
The Loggly and SolarWinds trademarks, service marks, and logos are the exclusive property of SolarWinds Worldwide, LLC or its affiliates. All other trademarks are the property of their respective owners.

Loggly Team